Megick · June 30, 2026 · 17 min read
The Most Detailed FLUX Local Deployment Guide: How to Turn AI Image Generation into Your Own Production Line in 2026
The Most Detailed FLUX Local Deployment Guide: How to Turn AI Image Generation into Your Own Production Line in 2026
If you have been using online AI image-generation tools for a while, you will probably run into two very practical problems sooner or later.
The first is that once you start generating images in batches, credits, queue times, and per-image costs become noticeable. The second is that your team may want to preserve fixed styles, dimensions, and post-processing workflows instead of starting from scratch every time a new batch of images is needed.
This is where local FLUX deployment becomes valuable.
It is not just about “installing a model on your computer.” More importantly, it allows you to standardize frequently used prompts, brand colors, product compositions, LoRAs, export sizes, and post-processing nodes. What used to depend on inspiration and personal instinct can gradually become a repeatable production pipeline.
This article will not pile up commands like a manual or dive into unnecessary technical mystique. Instead, it follows a practical implementation path: first determine whether local deployment is right for you, then choose the right model and VRAM setup, and finally explore two routes—ComfyUI and Python Diffusers.
A more time-efficient approach is to validate your prompts, compositions, and visual direction in Megick Studio first, then move the scenarios you repeat every week into a local workflow. You can also explore AI image and video generation on Megick.com. For video-generation tutorials, see: https://megick.com/tutorials.
1. Why Is Local FLUX Deployment Still Worth It in 2026?
The value of FLUX is not limited to whether it can generate a visually appealing image.
It is better suited to serious production tasks in areas such as prompt understanding, visual quality, and the relationship between text and objects. The publicly available FLUX.1 dev and FLUX.1 schnell models from Black Forest Labs are both 12B-scale text-to-image models. schnell focuses on fast generation in one to four steps, while dev is more oriented toward high-quality output and stronger prompt adherence. On the image-editing side, FLUX.1 Kontext dev focuses on modifying existing images through instructions while preserving character and style consistency as much as possible.
But local deployment is not something everyone needs.
If you only occasionally create a WeChat Official Account illustration, a social-media cover, or a product concept sketch, generating directly in Megick.com or Megick Studio is usually easier. You do not need to manage environments or download models, and you can continue into video generation and asset extension immediately after creating an image.
The people most suited to local deployment generally fall into three groups:
- Content teams that need to generate images in batches every day;
- Design teams that want to standardize brand visuals and product-image workflows;
- Technical users who want to explore LoRAs, nodes, private workflows, and automated generation.
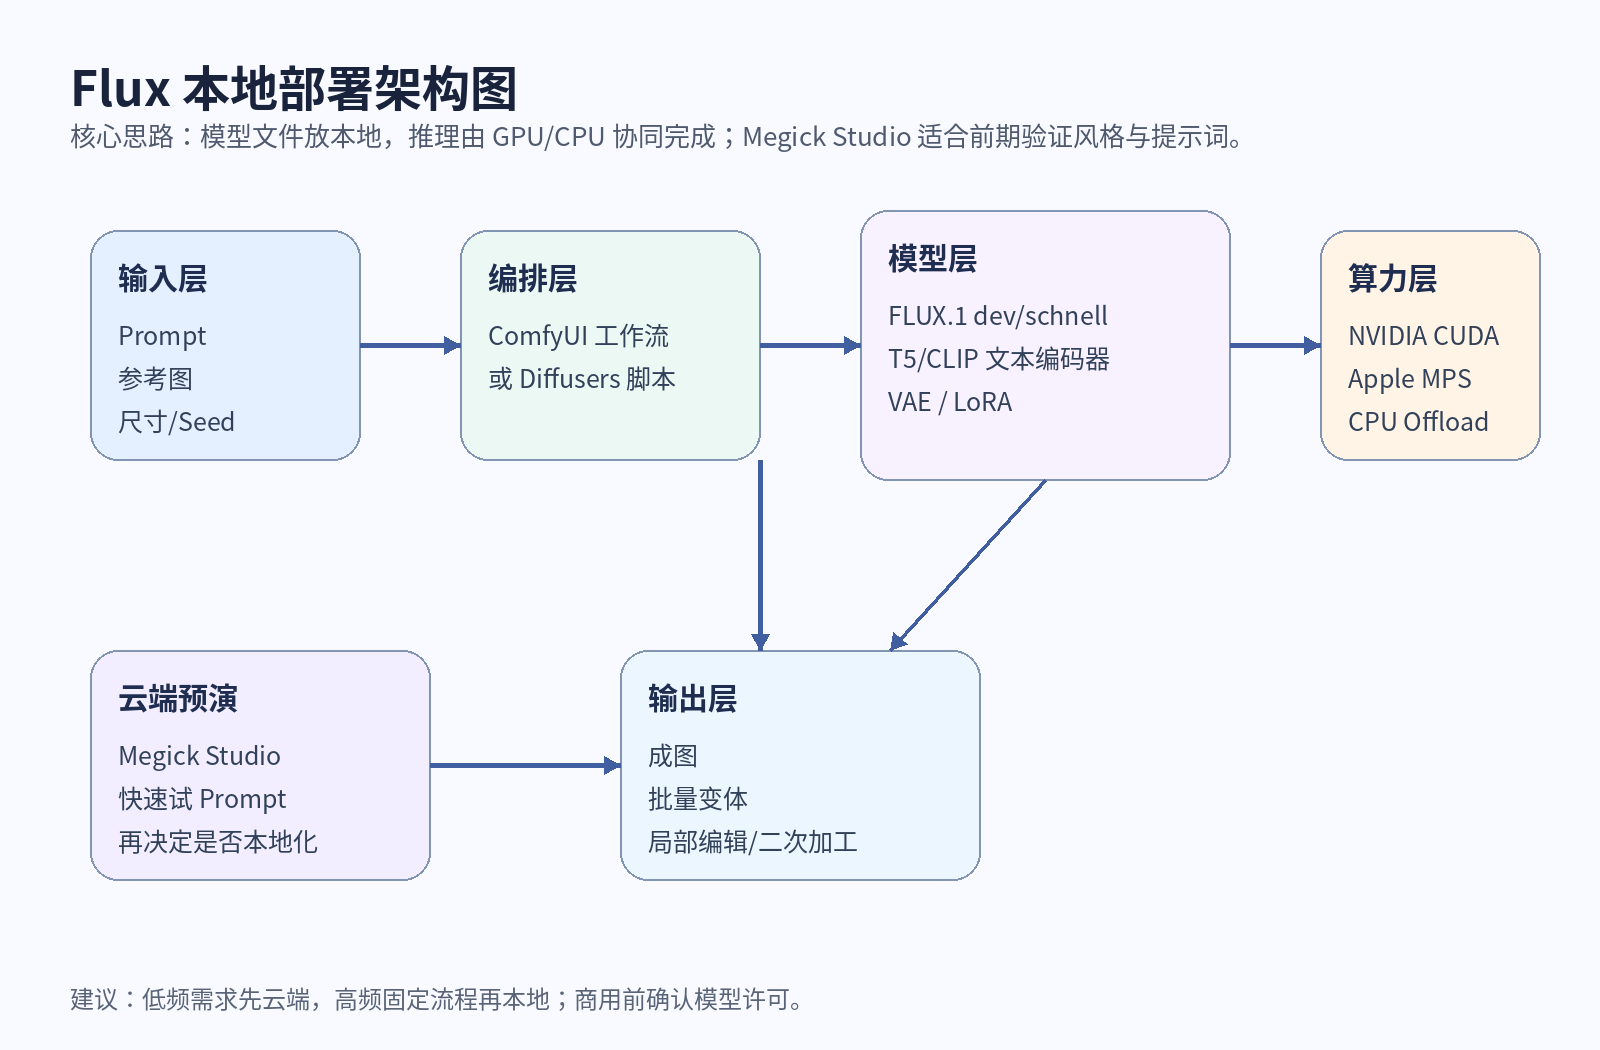
The point of local deployment is not “I can run a model too.” The point is that you can control your workflow.
For example, you may need to generate ad creatives for the same product every week in different colors, seasonal themes, and dimensions. Online tools can certainly do this, but once a local workflow is working, product placement, lighting, backgrounds, camera language, and LoRA weights can all be standardized. Later, you only need to change the product name, color, and key selling point to generate assets in batches.
That is where local deployment truly saves time.
2. Choose Your Route First: ComfyUI or Python?
There are two mainstream routes for deploying FLUX locally.
The first is ComfyUI.
It is suitable for designers, operators, and content teams, as well as anyone who prefers visual node-based workflows. Models, encoders, VAEs, LoRAs, and Control-related nodes can all be arranged on a canvas. The process is visible, and team handoff is relatively intuitive.
Its drawbacks are equally real: during the first installation, beginners can easily get confused about where model files should go, why nodes throw errors, or why a workflow cannot find the required encoder.
The second route is Python Diffusers.
It is more suitable for developers or teams planning to integrate FLUX into their own systems. For example, if you want to build an internal batch poster generator, place FLUX in a backend task queue, integrate it into a website admin panel, or automate it through scripts, the Python route is usually more stable.
However, you will also need to handle dependencies, VRAM usage, exceptions, queues, and task states yourself.
Use the following table as a starting point:
| Your Goal | Recommended Route |
|---|---|
| Get it running, generate images, and tune styles | ComfyUI |
| Batch generation, website integration, or backend use | Python Diffusers |
| Low VRAM but still want to experiment | ComfyUI + quantized models |
| Team delivery and early visual validation | Test prompts in Megick Studio, then replicate the workflow locally |
If you are new to FLUX, I would recommend starting with ComfyUI.
The reason is simple: in image generation, many problems are not code errors. You often cannot tell which step in the workflow caused the change. Once ComfyUI lays the process out visually, you can inspect the model, encoder, sampler, VAE, and output directly, making troubleshooting much easier.
3. Which Model Should You Choose? Do Not Mix Up dev, schnell, and Kontext
When many people first deploy FLUX, their first question is:
Which model is the best?
But the more useful question is:
What am I planning to use it for?
| Model | Best For | Less Suitable For |
|---|---|---|
| FLUX.1 schnell | Fast drafts, operational visuals, batch first passes | Final images requiring extremely high visual quality |
| FLUX.1 dev | High-quality images, photographic realism, brand visuals, complex prompts | Running unoptimized on low-VRAM hardware |
| FLUX.1 Kontext dev | Editing existing images, swapping local elements, preserving characters | Pure batch text-to-image generation from scratch |
FLUX.1 schnell: Get It Running First, Then Think About the Ceiling
If this is your first FLUX deployment, start with schnell.
Its defining characteristic is speed. With fewer steps, it is well suited to quickly testing compositions, prompts, and product directions. You can use it to verify that your environment is working, then see whether your GPU and workflow can run reliably.
Not every image it produces will be suitable for final delivery, but it is highly useful for first drafts, concept testing, operational visuals, and batch direction screening.
FLUX.1 dev: Better for Key Visuals and Higher-Quality Work
dev is better when you already know what you want.
It is suitable for product key visuals, brand KVs, character concept art, photographic-style images, complex scenes, and content that needs to follow prompts more precisely. It requires more VRAM and a more complete environment setup, but its output ceiling is usually higher.
If you are creating commercial visuals, dev is worth the extra effort.
FLUX.1 Kontext dev: It Is Not a Replacement for Text-to-Image Generation
Kontext dev is closer to an image-editing tool.
It is suitable for modifying local areas of an existing image, changing backgrounds, swapping products, adjusting elements, and preserving characters. For example, if you already have a character image and only want to change the outfit, environment, or time of day from daytime to evening—without losing the person’s face or overall character—Kontext is a better fit.
Do not start by stacking dev, Kontext, LoRAs, Control nodes, and high-resolution enhancement all at once.
The hardest deployment issues to troubleshoot usually do not come from the model itself. They come from introducing too many variables at the same time.
4. Hardware Preparation: VRAM Determines the Experience, Not Whether You Can Try It
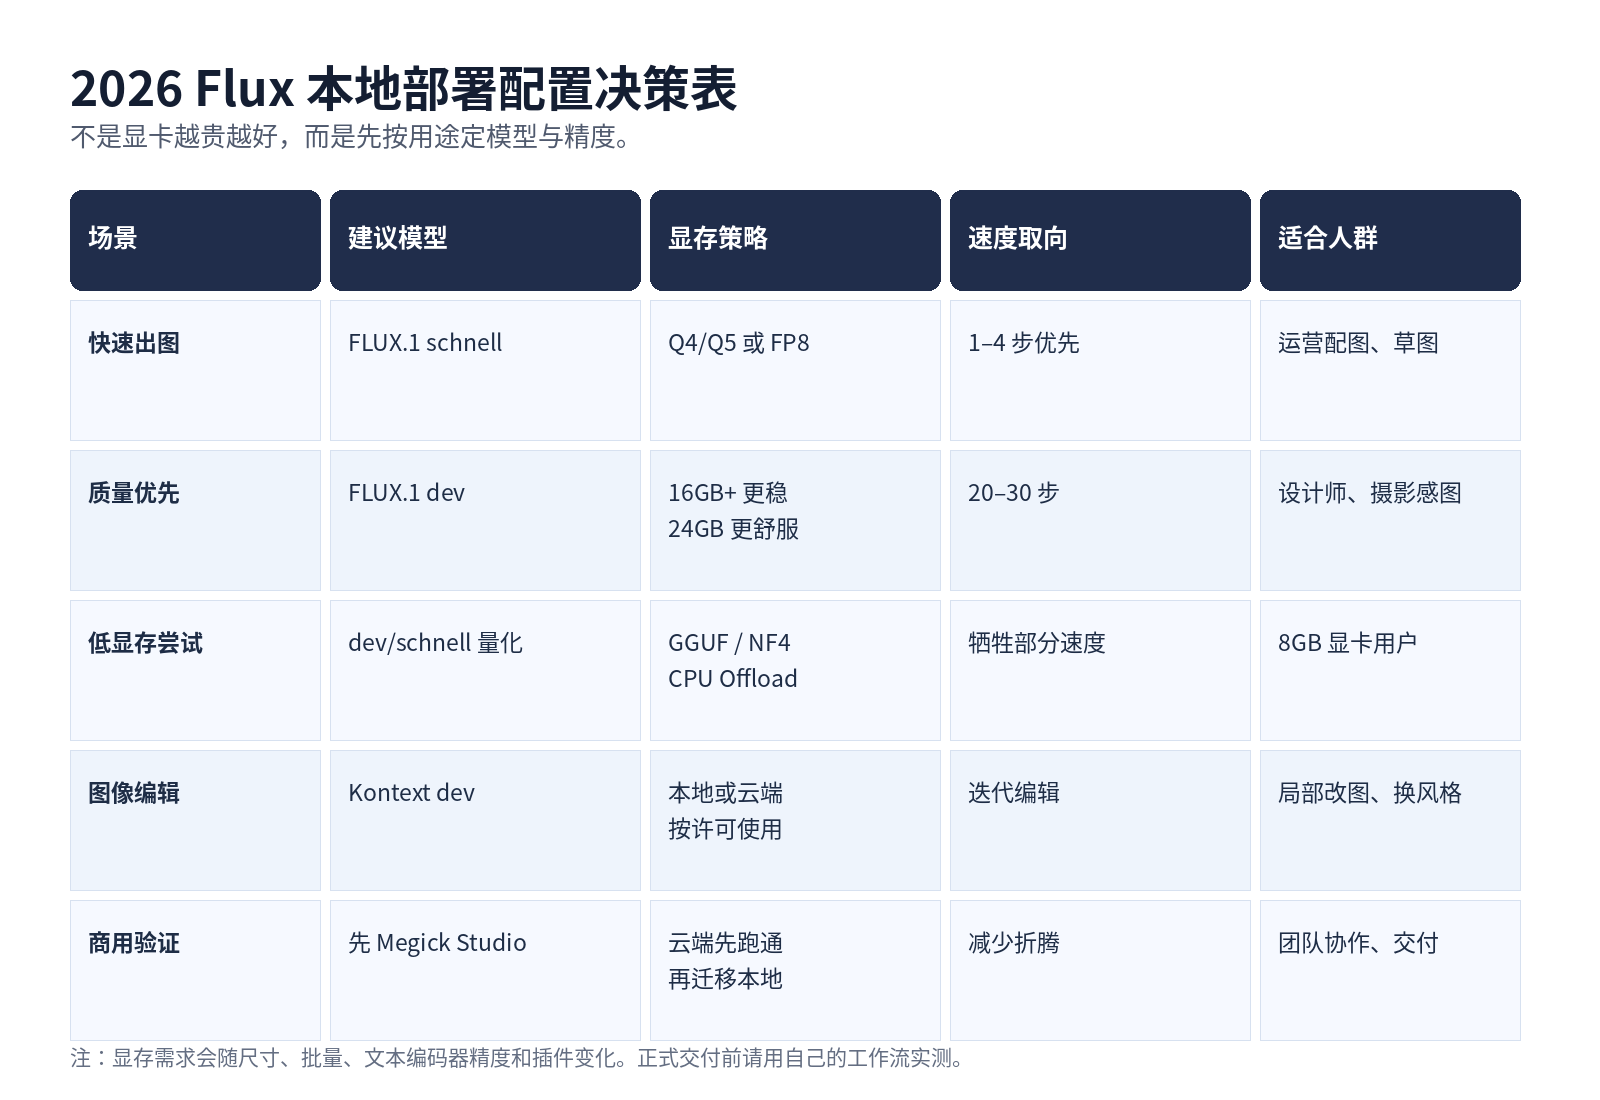
FLUX can run on lower-VRAM hardware through quantization, CPU offloading, and reduced image sizes.
But there is a significant difference between “it can run” and “it is comfortable to use.”
| Hardware Configuration | Viable Strategy | Expected Experience |
|---|---|---|
| 8GB VRAM | Quantized models, lower resolutions, CPU offload | It can run, but do not expect it to be particularly fast |
| 12GB VRAM | schnell runs relatively comfortably; dev needs optimization | Suitable for learning and light production |
| 16GB VRAM | dev becomes practical | A recommended starting point for serious deployment |
| 24GB VRAM or more | dev, larger image sizes, and complex workflows become more stable | Better suited to team production |
| Apple Silicon | MPS-based workflows can be attempted | Convenient, but typically slower than comparable NVIDIA hardware |
This is only a practical reference, not an absolute standard.
Different systems, drivers, model precisions, resolutions, node counts, and workflow combinations will all change VRAM requirements. But if you plan to use FLUX long term, do not focus only on “what is the minimum required to run it.” Consider whether you can work with it for several hours continuously without frustration.
Also, do not overlook storage space.
The main FLUX models, text encoders, VAEs, quantized versions, LoRAs, ComfyUI nodes, and cache files can take up considerable space. Reserve at least 80GB of clean storage. Use English-only folder paths when possible, and avoid Chinese characters, spaces, and deeply nested directories.
A surprising number of strange errors eventually turn out to be path-related.
5. Route A: Deploying FLUX Locally with ComfyUI
This route is best suited to non-developers and is the first path I would recommend.
1. Install the Basic Environment
Windows users should prepare Git, Python, and properly functioning NVIDIA drivers.
First, confirm that the GPU driver is working:
nvidia-smi
Then clone ComfyUI:
git clone https://github.com/comfyanonymous/ComfyUI.git
cd ComfyUI
Create a Python environment:
python -m venv venv
venv\Scripts\activate
Install dependencies:
pip install -r requirements.txt
If you use an NVIDIA GPU, the first thing to verify is not whether you installed the newest version of everything.
Instead, confirm that these three components are compatible:
- GPU driver;
- CUDA;
- PyTorch.
If startup fails, check those three first. Do not immediately delete models, reinstall your system, or switch workflows.
2. Place the FLUX Model Files
ComfyUI directory structures can vary slightly depending on version, nodes, and workflows, but a common layout looks like this:
ComfyUI/
  models/
    diffusion_models/   # FLUX base model or quantized model
    text_encoders/      # Text encoders such as t5xxl and clip_l
    vae/                # ae or VAE files
    loras/              # FLUX LoRAs
One of the most common beginner issues is:
I downloaded the model, so why can’t I see it in the node list?
The usual causes are limited:
- The model file is in the wrong directory;
- The file download is incomplete;
- The encoder required by the workflow has not been downloaded;
- The wrong model file is selected in the node;
- ComfyUI was not restarted.
Different workflows may expect different filenames. You do not always need to rename the model file, but you must select the correct file in the node.
At the beginner stage, do not download five or six versions at once. Start with one complete combination that you know can run. Once the workflow is confirmed, gradually add quantized models, LoRAs, Control nodes, and high-resolution enhancement.
3. Start with the Smallest Possible Workflow
Beginners should start with a minimal workflow:
Load Model → Text Encoder → Empty Latent Image → Sampler → VAE Decode → Save Image
Generate one image at 1024×1024 or a lower resolution first.
Do not open ComfyUI and immediately add LoRAs, high-resolution enhancement, inpainting, batch queues, ControlNet, and multiple custom nodes. First verify that the base model, encoder, VAE, and sampling pipeline all work. Then, each time you add a new capability, you will know where the issue came from if something breaks.
4. Starting Parameters for schnell and dev
| Parameter | schnell Starting Point | dev Starting Point |
|---|---|---|
| Steps | 4 | 20–30 |
| Guidance | Usually low or based on workflow defaults | Start around 3.5 |
| Resolution | Start at 768 or 1024 | Start at 1024; reduce if VRAM is insufficient |
| Seed | Use a fixed seed for comparison | Use a fixed seed for parameter tuning |
The most important rule when tuning parameters is: change only one variable at a time.
Do not change the model, resolution, step count, guidance, LoRA weight, and sampler all at once. If the image improves, you will not know what caused the improvement. If it gets worse, you will not know what to revert.
6. Route B: Deploying FLUX with Python Diffusers
If you want to integrate FLUX into your own system, the Python route is usually a better choice.
For example:
- Internal batch poster generators;
- Automated e-commerce image variations;
- Brand asset task queues;
- Website backend generation endpoints;
- API workflows;
- Automated content production.
1. Create an Environment
python -m venv flux-env
source flux-env/bin/activate  # On Windows, use flux-env\Scripts\activate
pip install -U torch diffusers transformers accelerate sentencepiece protobuf
For real deployment, install the PyTorch version that matches your CUDA and GPU environment. Do not assume that pip install torch will automatically enable GPU usage.
2. Run a FLUX.1 schnell Example
import torch
from diffusers import FluxPipeline

pipe = FluxPipeline.from_pretrained(
    "black-forest-labs/FLUX.1-schnell",
    torch_dtype=torch.bfloat16
)
pipe.enable_model_cpu_offload()

prompt = "A clean product photography scene, soft studio light, white background, premium texture"

image = pipe(
    prompt,
    guidance_scale=0.0,
    num_inference_steps=4,
    max_sequence_length=256,
    generator=torch.Generator("cpu").manual_seed(42)
).images[0]

image.save("flux-schnell-test.png")
This code is suitable for validating the environment first.
If it generates successfully, the core model loading, inference, and image-saving pipeline is working. You can then move on to batch jobs, model quantization, queues, and concurrency.
3. Run a FLUX.1 dev Example
import torch
from diffusers import FluxPipeline

pipe = FluxPipeline.from_pretrained(
    "black-forest-labs/FLUX.1-dev",
    torch_dtype=torch.bfloat16
)
pipe.enable_model_cpu_offload()

prompt = "A cinematic portrait of a futuristic designer workspace, realistic lighting, detailed materials"

image = pipe(
    prompt,
    guidance_scale=3.5,
    num_inference_steps=28,
    max_sequence_length=512,
    generator=torch.Generator("cpu").manual_seed(123)
).images[0]

image.save("flux-dev-test.png")
If generation is unusually slow, do not immediately assume FLUX is the problem.
First, verify whether inference is running on the CPU. Many cases of “FLUX is extremely slow” turn out to be caused by CUDA not being enabled or PyTorch not matching the current environment.
7. Speed Optimization: The Fundamentals That Actually Matter
1. Reduce Resolution Before Chasing High Resolution
If 1024 is not running reliably, do not jump straight to 1536 or 2048.
Use a medium resolution first to establish composition, character placement, product placement, and visual direction. Once the composition is stable, upscale and post-process it later. This saves far more time than forcing high resolution from the beginning.
2. Use Quantized Models Wisely
Options such as GGUF, NF4, and FP8 can reduce VRAM pressure.
However, different quantized versions vary in speed, quality, and compatibility. On lower-VRAM machines, use quantized models to get a stable workflow running first, then switch back to higher-precision versions for high-quality delivery.
Do not try to enable every feature at once on an 8GB GPU. Generating stable and usable images is more valuable than repeatedly running out of memory.
3. Remove Unnecessary Nodes
The more complex a ComfyUI workflow becomes, the more important it is to regularly remove nodes you no longer need.
Many speed problems do not come from FLUX itself. They come from stacking preprocessing, post-processing, repeated previews, duplicate sampling, and inactive nodes until the entire workflow slows down.
Once your workflow is stable, save a dedicated “production version.” Keep only the necessary nodes instead of starting from an experimental workflow every time.
4. Standardize Your Prompt Assets
Real production efficiency does not come from rewriting prompts every time.
It comes from turning frequently used camera angles, lighting setups, materials, compositions, character settings, and product-placement rules into reusable templates.
One efficient method is to test twenty to thirty directions quickly in Megick Studio, keep the versions that are stable and reusable, then move them into a local batch-generation workflow.
The cloud stage answers:
What should this image actually look like?
The local stage answers:
How can we generate it reliably in batches?
That division of labor is much more comfortable.
5. Split Batch Jobs into Queues
Do not submit hundreds of images at once.
Validate a smaller batch first. Confirm that the prompt, resolution, model, VRAM usage, and output format are all working correctly, then run the task in separate batches. This makes it easier to find bad images, incorrect parameters, and memory leaks—and it prevents one failed job from blocking the entire queue.
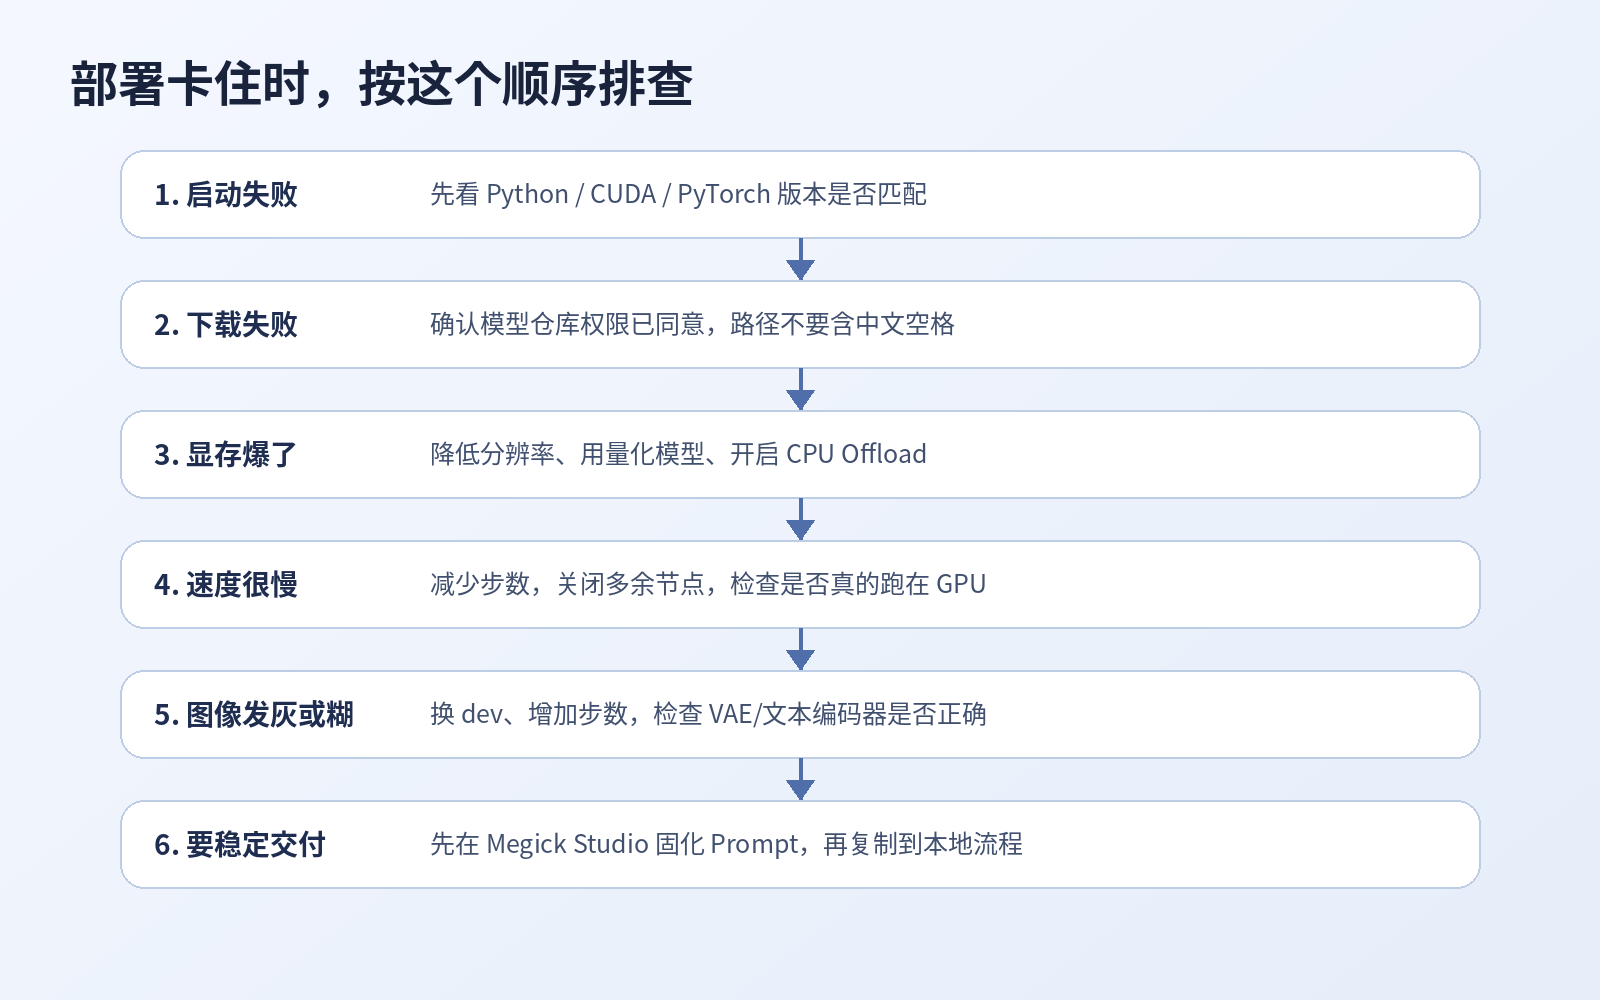
8. Common Errors: Troubleshoot in This Order
1. The Model Cannot Be Loaded After Downloading
This is usually caused by one of the following:
- The file is in the wrong directory;
- The download is incomplete;
- The text encoder or VAE required by the model is missing;
- The wrong model is selected in the workflow node;
- There is an issue with permissions, paths, or filenames.
Validate using the smallest possible workflow first.
Do not troubleshoot inside a complex workflow. Otherwise, you will be dealing with node issues, model issues, and parameter issues at the same time, making the root cause difficult to identify.
2. CUDA Out of Memory
Try these steps in order:
- Lower the resolution;
- Reduce the batch size;
- Enable CPU offload;
- Switch to a quantized model;
- Remove unused nodes and previews;
- Restart ComfyUI or the Python process to release VRAM.
When VRAM is insufficient, blindly increasing virtual memory has limited value. It may prevent a crash, but generation will usually become painfully slow.
3. Generation Is Unusually Slow
First, use the following command to check whether the GPU is being used:
nvidia-smi
If you do not see a Python or ComfyUI process using the GPU, the most likely issue is a PyTorch/CUDA environment mismatch.
Also make sure you have not left too many browser previews, high-resolution enhancement nodes, continuous batch nodes, or duplicate model-loading nodes enabled. In many cases, the model is not slow—the workflow simply contains too many things you forgot to turn off.
4. Image Quality Is Inconsistent
Start by fixing the seed.
Then compare models, steps, and guidance under the same prompt. Do not change ten parameters at once.
FLUX is relatively friendly to natural-language prompts, but that does not mean you can write anything casually. Be clear about the subject, camera, material, lighting, background, and composition. The more commercially important the image is, the less you should rely on the model to guess what you mean.
5. Licensing Issues Before Commercial Use
Always review the model license before deployment.
schnell and dev have different licensing boundaries, and Kontext dev has its own requirements as well. When using models commercially as a team, do not assume every scenario is allowed simply because you see the word “open source.”
Confirm:
- The current model version;
- Your intended use;
- Whether the output will be used in client projects;
- Whether it will be used for advertising, e-commerce, SaaS, or platform services;
- Whether redistribution or secondary deployment is involved.
Licensing can feel boring, but it is better than reworking a project immediately before launch.
9. A FLUX Workflow for Teams
I recommend a combination of “cloud validation + local production” rather than spending two days reinstalling environments from the start.
Step One: Test Directions in the Cloud First
Start by testing prompts quickly in Megick Studio.
Validate the style, composition, character, camera language, product placement, and common issues. At this stage, speed is the priority. Do not spend all your time managing GPU environments.
Step Two: Identify the Truly High-Frequency Tasks
Not everything is worth moving locally.
Product hero images, WeChat Official Account covers, character concept art, and short-video storyboard images are good candidates for local workflows if you need them every week. For one-off special creative images, continuing to use cloud tools may actually save more time.
Step Three: Recreate the Stable Workflow in ComfyUI
Standardize the following:
- Model;
- Resolution;
- Seed strategy;
- LoRA weights;
- Common prompt templates;
- Export format;
- Post-processing nodes.
Once the workflow is fixed, differences between team members become much smaller. People no longer need to tune everything from scratch based on personal instinct.
Step Four: Use Python for Batch Jobs
Turn stable prompts into templates.
Variables can be reserved for product name, color, scene, material, selling point, camera angle, and dimensions. This allows backend task queues to run batches instead of requiring someone to manually enter dozens of prompts each time.
Step Five: Move Video Tasks Back to Megick.com
Image generation and storyboard creation can run locally.
Image-to-video, text-to-video, and advertising short films can then be created using Megick.com’s video capabilities. This preserves the controllability of local models without forcing local GPUs to handle the entire video-generation workload.
10. FLUX Prompt Templates You Can Copy Directly
The following prompts are useful for testing whether your FLUX environment is stable.
Product Photography
A premium product photography scene of [product], centered composition, soft studio lighting, clean background, realistic material texture, sharp focus, commercial advertising style
WeChat Official Account Cover
A modern editorial cover image about [topic], bold composition, clean layout, cinematic lighting, high contrast, premium tech publication style, space reserved for title text
Character Concept Art
A realistic character concept portrait of [character], detailed facial features, natural skin texture, cinematic light, shallow depth of field, high-end visual development style
Short-Video Storyboard
A cinematic storyboard frame showing [scene], dynamic camera angle, clear subject, dramatic lighting, realistic environment, suitable for AI video generation reference
When testing, do not rush to make prompts extremely long.
FLUX is relatively good at understanding natural language, but the most stable production prompts are usually not packed with adjectives. They are structured clearly: who is the subject, where are they, what material is involved, what is the lighting, what is the composition, and what is the image meant to be used for?
Conclusion: Local Deployment Is Not Showing Off—It Is Turning Generation into Production
The point of local FLUX deployment is not to install every available model.
What truly matters is building an image-production pipeline that can be replicated, troubleshot, and delivered.
Beginners should first get ComfyUI running. Developers can then integrate Diffusers into their systems. Low-VRAM hardware should start with quantized versions. When high-quality delivery is required, switch back to more stable configurations. During the idea and prompt-validation stages, use Megick Studio or Megick.com to test quickly instead of wasting time repeatedly adjusting environments.
Once the workflow is running smoothly, AI image generation stops being a matter of luck—hoping for one good image.
It becomes a content engine capable of continuously producing covers, posters, product images, character visuals, and video storyboards.
References
- Black Forest Labs: Official FLUX minimal inference repository
- Hugging Face: Model cards for FLUX.1 dev, FLUX.1 schnell, and FLUX.1 Kontext dev
- Hugging Face Diffusers: Documentation for FluxPipeline and FluxKontextPipeline
- Black Forest Labs: FLUX.1 Kontext dev release notes