Megick · June 30, 2026 · 11 min read
How to Create Photorealistic AI Images in 2026: Practical Methods for Lighting, Texture, and Camera Feel
How to Create Photorealistic AI Images in 2026: Practical Methods for Lighting, Texture, and Camera Feel
In 2026, AI image generation is no longer just about whether a model can produce an image.
With the same model, some people can create product shots, portraits, and lifestyle posters that look close to commercial photography. Others still get images with an unmistakable artificial feel: skin that looks waxy, products that look like plastic, interiors that resemble showroom renders, lighting with no visible source, and everything sharpened to an unnatural degree.
The difference is not only the model.
What matters more is whether you describe the image the way a photographer would.
To create photorealistic AI images, AI photography effects, or realistic AI artwork, writing photorealistic, 8K, or ultra realistic is nowhere near enough. The credibility of a realistic image usually lies in smaller details: where the light comes from, how shadows fall, whether materials have believable texture, whether the focal length makes sense, and whether the people and environment carry traces of real life.
This article breaks down a reusable workflow for achieving more practical photorealistic results in 2026. You can apply it to product images, portraits, home interiors, food photography, e-commerce hero images, Xiaohongshu covers, and short-video opening frames.
The models and workflows mentioned here can also be explored on Megick.com and Megick Studio as needed. Once a static image is finalized, you can extend the key visual into AI video assets through Megick.com’s video tutorials.
1. Why So Many AI Images Do Not Look Like Real Photos
Most AI-generated images do not look artificial because their resolution is too low. They look artificial because they lack the physical logic of photography.
Real photographs usually share several traits:
- The light source has a clear direction, and shadows follow it;
- Skin, fabric, metal, glass, and wood all respond to light differently;
- The camera has a defined perspective and focal length rather than looking like an infinitely sharpened collage;
- The background does not compete with the subject, but still provides enough spatial context;
- The image usually contains small imperfections: wrinkles, fingerprints, faint dust, natural color shifts, and uneven reflections.
Many AI images look fake precisely because they are too perfect.
Skin is polished like wax. Products look like 3D renders. Backgrounds show no signs of use. Lighting has no clear source. Every object has the exact same level of sharpness. At first glance, the image may look refined. On a second look, something feels wrong.
So the key to realistic AI image generation is not stacking adjectives. It is changing your prompt from an “art description” into a “photography direction.”
2. The Core Logic of Photorealistic AI Image Prompts in 2026
OpenAI’s image-prompt guidance notes that natural, photo-like results are easier to achieve when prompts describe a real shooting environment, using photographic language such as lenses, lighting, composition, and texture while explicitly preserving realistic details and minor imperfections.
Google Gemini’s image-generation materials also emphasize that conversational generation and editing can be used to refine image details step by step. Adobe Firefly’s prompt guidance similarly recommends describing the subject, background, colors, lighting, and style instead of giving the model only a few abstract keywords.
A more practical way to put this is:
Do not only tell AI what you want to see. Tell it how the photo was taken.
A mature AI photography prompt should ideally include six layers of information:
- Subject: Who or what is being photographed, and what state or action they are in;
- Environment: Where the image is taken and what spatial details are present;
- Lighting: Natural light, window light, warm light, side backlight, night lighting, and where the light comes from;
- Lens: 35mm, 50mm, 85mm, wide-angle, standard, telephoto, close-up, or half-body framing;
- Materials: Skin pores, fabric weave, metal scratches, glass refraction, wood grain, food moisture;
- Constraints: No plastic look, oversharpening, fake reflections, waxy skin, or showroom-like interiors.
Once these six layers are clear, the realism of the result usually improves significantly.
3. Lighting Secrets: Write the Light Before You Write the Image
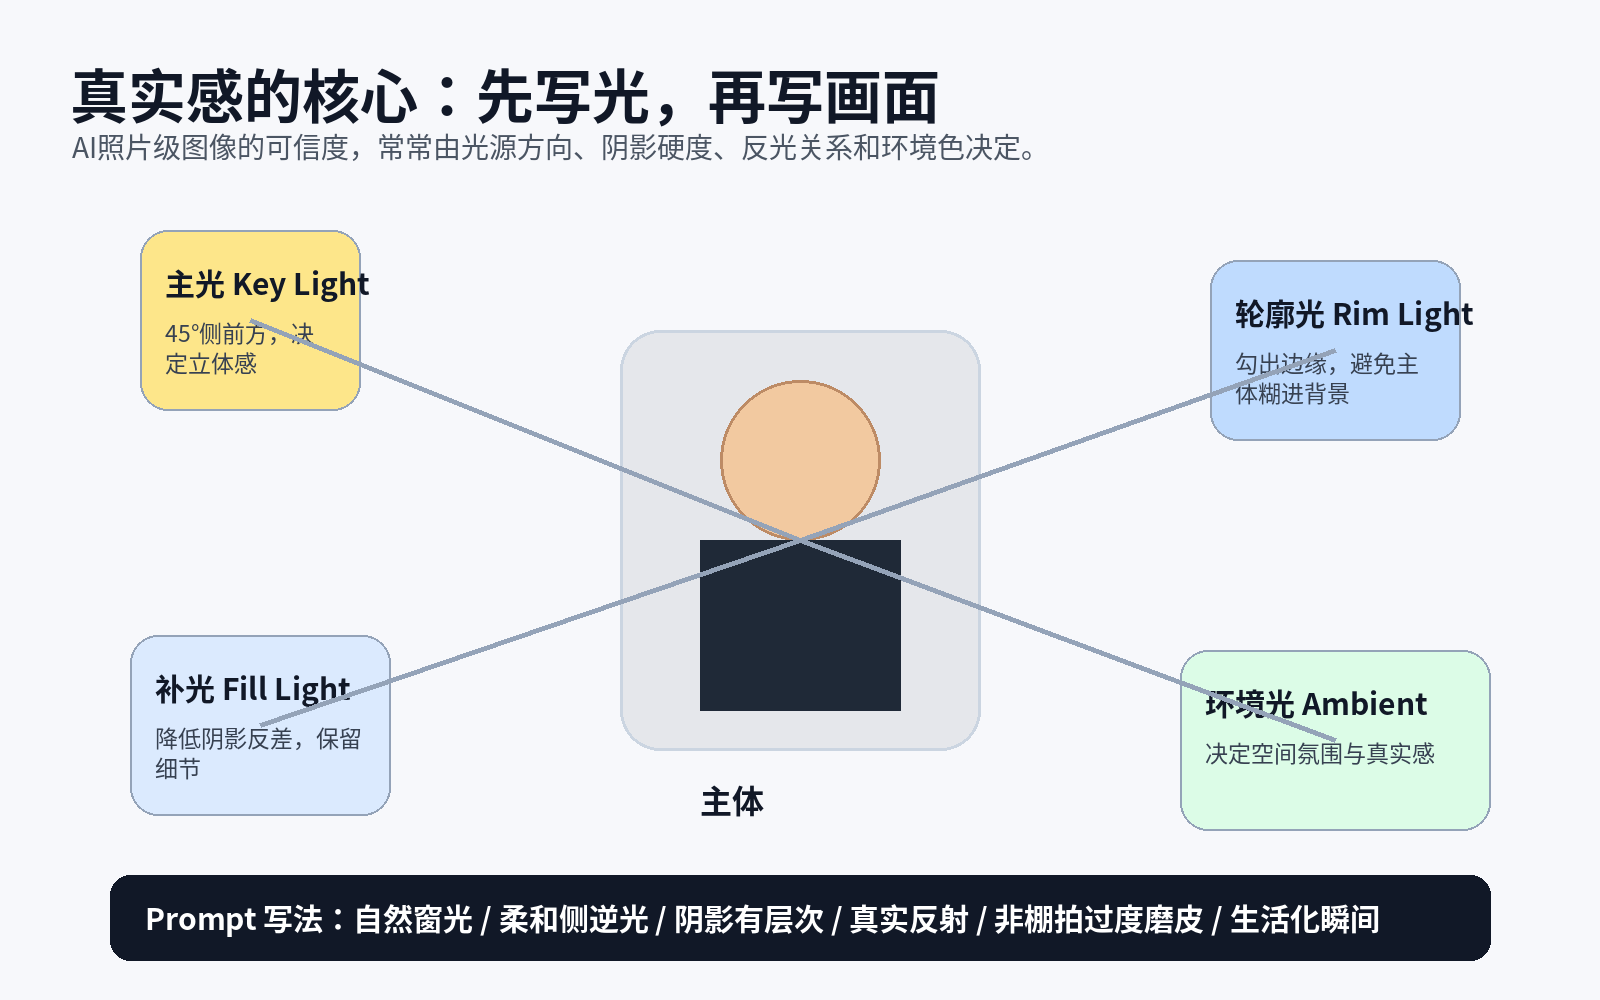
Many people write prompts in this order: subject, style, high resolution, realism.
A more effective order is often:
Scene → Lighting → Subject → Lens → Materials → Constraints
Because photography begins with light.
Lighting determines spatial depth, and spatial depth determines whether an image feels believable.
1. Natural Window Light: Best for Lifestyle and Product Scenes
Natural window light is soft, credible, and less likely to feel overly commercial.
It works especially well for skincare products, home interiors, coffee, handcrafted items, desk setups, outfits, and everyday lifestyle content.
You can write:
Natural window light enters from the left side of the frame, creating soft shadows. The tabletop has subtle reflections, the background falls into natural blur, and the overall image feels like a real lifestyle photo taken in the morning.
Suitable use cases:
- Xiaohongshu covers;
- Lifestyle product photography;
- Home-interior scenes;
- Coffee and food content;
- Everyday outfit images.
2. Side Backlighting: Best for Depth and Premium Feel
Side backlighting creates a natural rim light around the subject, giving people, glass, metal, and perfume bottles more depth and separation.
You can write:
Soft side backlighting comes from 45 degrees behind the subject, creating a natural rim light around the edges. Shadows are not too dark, and the image has an airy sense of depth and real spatial dimension.
Suitable use cases:
- Portrait photography;
- Perfume and jewelry;
- Glassware;
- Metal products;
- Brand key visuals.
3. Overcast Soft Light: Best for Authentic Street Photography
Overcast light has no hard shadows, making it ideal for street photography, travel, everyday fashion, and outdoor product imagery.
Its realism comes from low contrast, natural skin tones, and an environment that does not look overly retouched.
You can write:
Natural overcast soft light, low contrast, natural skin tones and environmental colors. The image should not have a strong studio-photography feel and should look like a genuine street photograph.
Suitable use cases:
- Street-style portraits;
- Travel content;
- Outdoor brands;
- Everyday social-media visuals;
- Urban lifestyle content.
4. Warm Indoor Lighting: Best for Food and Nighttime Atmosphere
Restaurants, cafés, bars, guesthouses, and nighttime lifestyle scenes often benefit from warm indoor lighting.
But instead of only writing “warm tones,” describe where the light comes from.
You can write:
Warm pendant lamps act as the primary indoor light source. The tabletop has soft shadows, the glass has realistic reflections, and background lights are gently blurred. The atmosphere feels warm without looking overly filtered.
Suitable use cases:
- Restaurant menu visuals;
- Café promotional images;
- Guesthouse night scenes;
- Beverage and food brands;
- Nightlife posters.
4. Texture Secrets: Realism Is Not “High Resolution,” It Is “Imperfection”
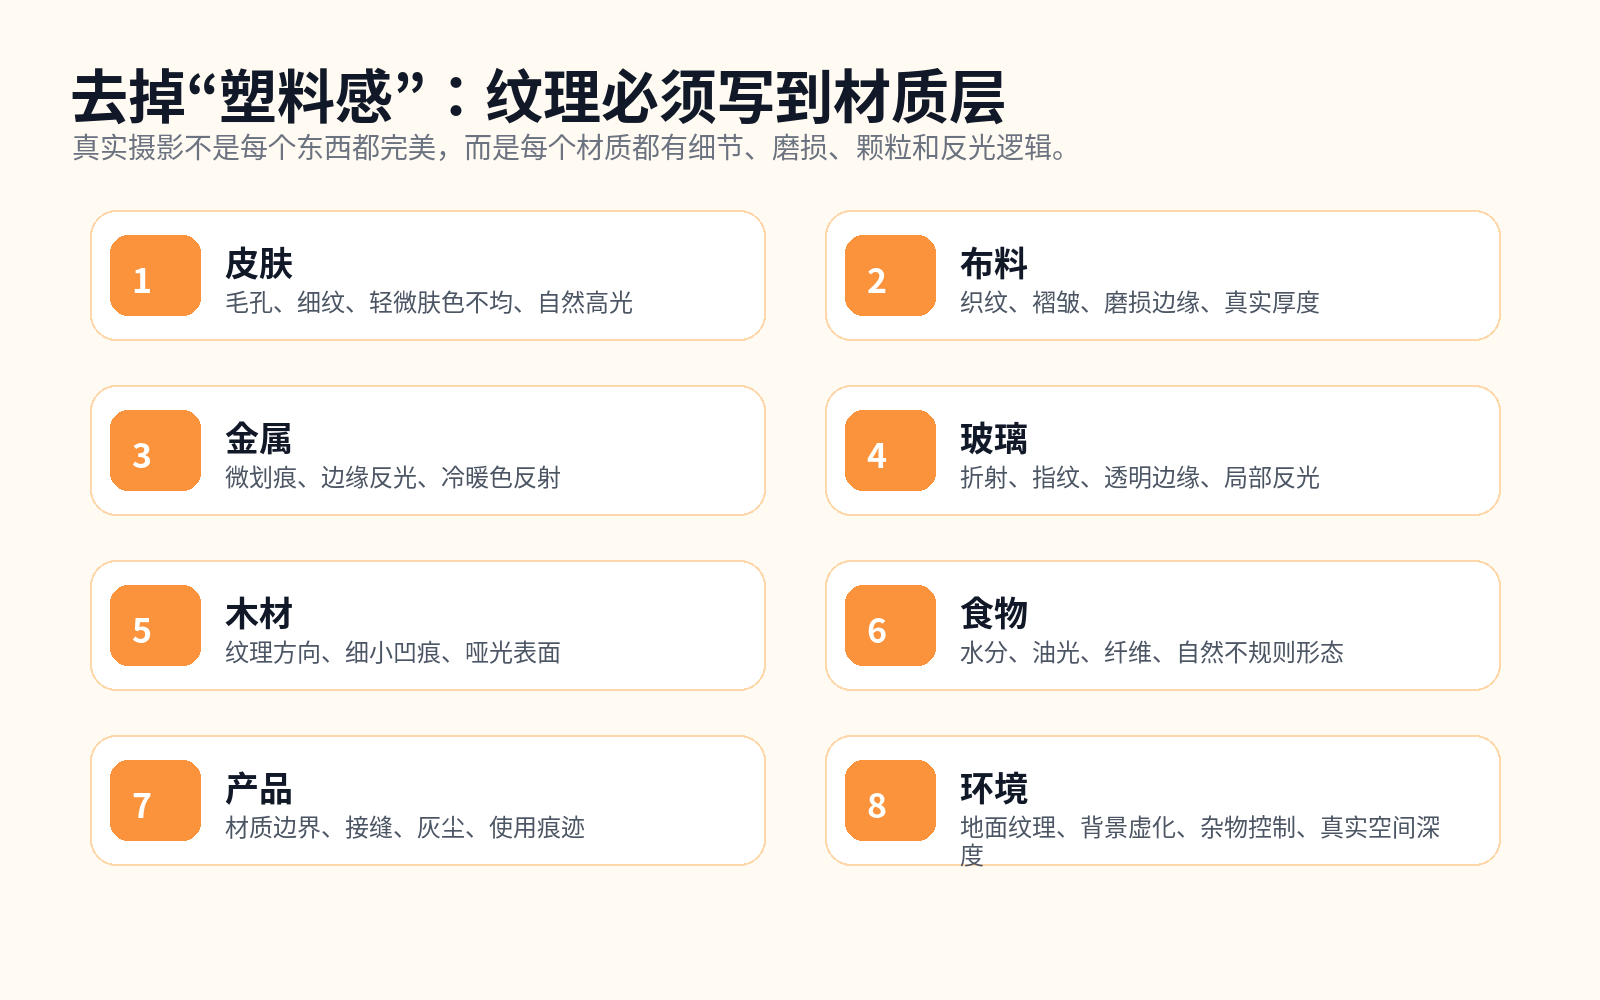
Many people assume higher resolution automatically means stronger photographic realism.
It does not.
High resolution only means more pixels. It does not guarantee realistic materials or lighting. Surfaces in real photographs are rarely as uniformly smooth as default AI outputs.
1. Skin Should Not Look Like Wax
The easiest way for portraits to fail is excessive skin smoothing.
Real skin needs subtle pores, fine lines, natural tonal variation, and highlights that are not perfectly even.
You can write:
Natural skin texture with subtle pores and fine lines, realistic skin-tone variation, natural facial highlights, and no wax-figure appearance.
2. Fabric Needs Visible Weave and Natural Wrinkles
Clothing, sofas, curtains, bedding, and home textiles can easily look like plastic sheets if they lack visible weave and natural folds.
You can write:
Fabric with visible weave and natural wrinkles, slight wear along the edges, realistic material thickness, and no plastic-like surface.
3. Metal Needs Micro-Scratches and Controlled Reflections
Metal looks artificial when the entire surface is uniformly shiny.
Real metal usually has tiny scratches, directional reflections, and edge highlights. Its reflections also change depending on the surrounding light.
You can write:
Metal surfaces with subtle micro-scratches and realistic reflections, clear but not blown-out edge highlights, and naturally reflected environmental colors.
4. Glass Needs Refraction, Fingerprints, and Environmental Reflection
Glass cups, perfume bottles, and skincare packaging can easily look like transparent plastic when they are too clean.
You can write:
Transparent glass with realistic refraction, subtle edge highlights, a few fingerprints and faint dust particles on the surface, with reflections consistent with the indoor light source.
5. Food Needs Moisture, Oil, and Irregularity
Food imagery looks artificial when everything is too neat.
Real food has moisture, oil sheen, fibers, seared edges, and irregular shapes.
You can write:
Food with natural oil sheen and moisture, slightly irregular edges, visible fibers and subtle sear marks, photographed like a real restaurant dish.
5. A Prompt Formula for Photorealistic AI Images
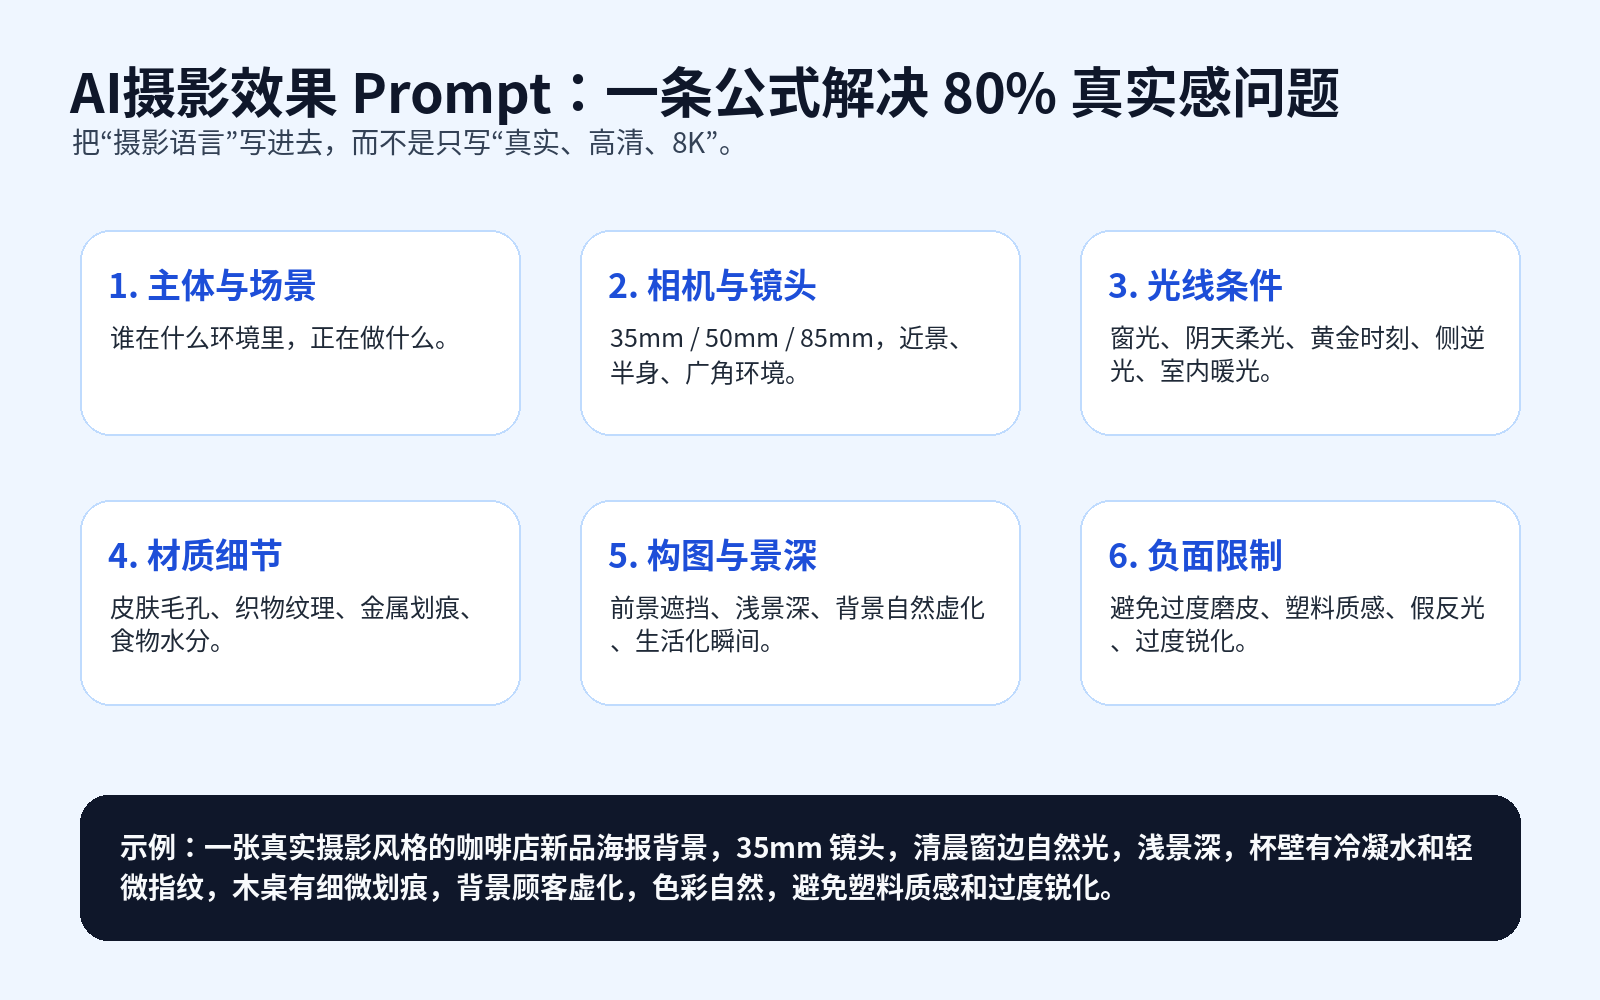
To generate photorealistic AI images more consistently, you can use this general formula:
A realistic photography-style image of {theme}. The subject is {subject}, located in {specific scene}, and is {action/state}.
Shot using {focal length/camera approach}, with {composition}, and {depth-of-field description}.
Lighting comes from {light-source type}, shining from {direction}. Shadows are {soft/crisp/layered}, with natural reflections.
Material details include {skin/fabric/metal/glass/wood/food texture}, preserving subtle real-world imperfections.
Natural color grading, like a real camera photograph. Avoid plastic textures, excessive skin smoothing, oversharpening, fake reflections, and an overly commercial studio look.
Template 1: Product Photography
A realistic photography-style skincare product image. The subject is a transparent glass serum bottle placed on a light wooden table near a morning window.
Shot as a close-up with a 50mm lens, the subject centered with shallow depth of field and naturally blurred background.
Natural window light enters from the left, producing soft shadows. The glass bottle has realistic highlights and subtle refraction around the edges.
Material details include faint fingerprints on the glass, natural wood grain on the tabletop, and slight paper texture on the bottle label.
Natural color grading. Avoid plastic textures, oversharpening, and fake reflections.
Template 2: Portrait Photography
A realistic lifestyle portrait of a young creator sitting by a café window and writing notes.
Shot with a 35mm lens in a half-body composition, with a slightly blurred coffee cup in the foreground and naturally blurred café lights in the background.
Morning window light enters from the right, with soft facial shadows. Preserve subtle pores and realistic skin tone.
Warm, natural colors. Avoid excessive skin smoothing, waxy skin, and a commercial studio-photography feel.
Template 3: Food Photography
A realistic restaurant-style photograph of a plate of tomato meat-sauce pasta on a dark wooden table.
Shot from a 45-degree overhead angle using a 50mm lens, with shallow depth of field and slightly blurred tableware in the background.
Warm indoor pendant lighting acts as the main light source. The plate has soft highlights and the tabletop shadows look natural.
The food has realistic oil sheen, sauce texture, and irregular grated-cheese pieces. Avoid plastic-looking food and oversharpening.
Template 4: Interior Photography
A realistic home-interior photograph of a living room with a cream-colored sofa and wooden coffee table. The room is clean but shows subtle signs of daily use.
Shot with a 24mm wide-angle lens from eye level, with natural room perspective.
Afternoon light enters through floor-to-ceiling windows, creating soft patches of light and shadow on the floor.
Materials include woven sofa fabric, wood grain on the table, and visible carpet fibers. The space should feel real, not like an overly staged showroom.
Template 5: E-Commerce Hero Background
A realistic photography-style e-commerce background image with a reserved central area for {product}, set on a modern minimalist desk.
Shot with a 50mm lens, clean composition, reserved copy space on the left, and shallow depth of field in the background.
Soft natural window light enters from the upper-left corner. Table reflections are realistic and shadows have visible depth.
Materials include a matte tabletop, paper texture, and a small amount of realistic dust. Avoid excessive smoothness and AI-like plastic texture.
6. Three Practical Cases: Turning an “AI Look” into a Photography Look
Case 1: Turning a Plastic Skincare Bottle into Real Glass
Low-Quality Prompt:
High-end skincare advertisement image, realistic, high resolution, clean background.
The problem with this prompt is that it provides no light source, material description, lens, or composition. The model is likely to generate an overly smooth conceptual image.
Improved Prompt:
A realistic photography-style premium skincare product image. The subject is a transparent glass serum bottle placed on a light beige stone surface.
Shot as a close-up with a 50mm lens, the bottle positioned slightly to the right with negative space on the left.
Soft natural window light enters from the upper-left side. The glass has realistic edge highlights and refraction, while the stone surface shows fine material texture.
The bottle has faint fingerprints and tiny dust particles. The color palette is natural and restrained. Avoid plastic texture, fake reflections, and excessive sharpening.
The improvement comes from specifying the subject, lens, lighting, materials, composition, and limitations. The result will be much closer to real commercial photography.
Case 2: Turning a Waxy Portrait into a Natural Candid Image
Low-Quality Prompt:
Realistic beautiful woman photo, cinematic look, ultra high resolution.
This kind of prompt often produces generic faces, excessive skin smoothing, and unnatural expressions.
Improved Prompt:
A realistic street-style lifestyle portrait of a young woman adjusting the strap of her bag outside a city café.
Shot with a 35mm lens in a medium composition, with pedestrians and urban street details naturally blurred in the background.
Overcast soft light, low contrast, natural skin pores and subtle skin-tone variation, with loose strands of hair visible.
The image should feel like a candid real-world photograph. Avoid studio lighting, excessive skin smoothing, plastic skin, and exaggerated cinematic filters.
The improvement comes from a more natural action, believable lighting, and details such as skin texture, loose hair, and environmental depth.
Case 3: Turning Model Food into a Real Restaurant Dish
Low-Quality Prompt:
An appealing hamburger image, realistic, high resolution, delicious.
This description often makes the food too perfect, like a display model rather than something served at a real table.
Improved Prompt:
A realistic restaurant-style photograph of a freshly served beef burger on a white plate, with a small portion of fries beside it.
Shot as a 45-degree close-up with a 50mm lens, shallow depth of field, and softly blurred restaurant lighting in the background.
Warm indoor light shines from the upper-right. The burger bun has natural oil sheen and sesame detail, the beef edges have light sear marks, and the cheese has uneven melted areas.
The tabletop has subtle signs of use. The scene should look like real restaurant photography, not plastic food or an oversharpened commercial render.
Oil sheen, sear marks, melting cheese, and minor tabletop wear all make the image more believable.
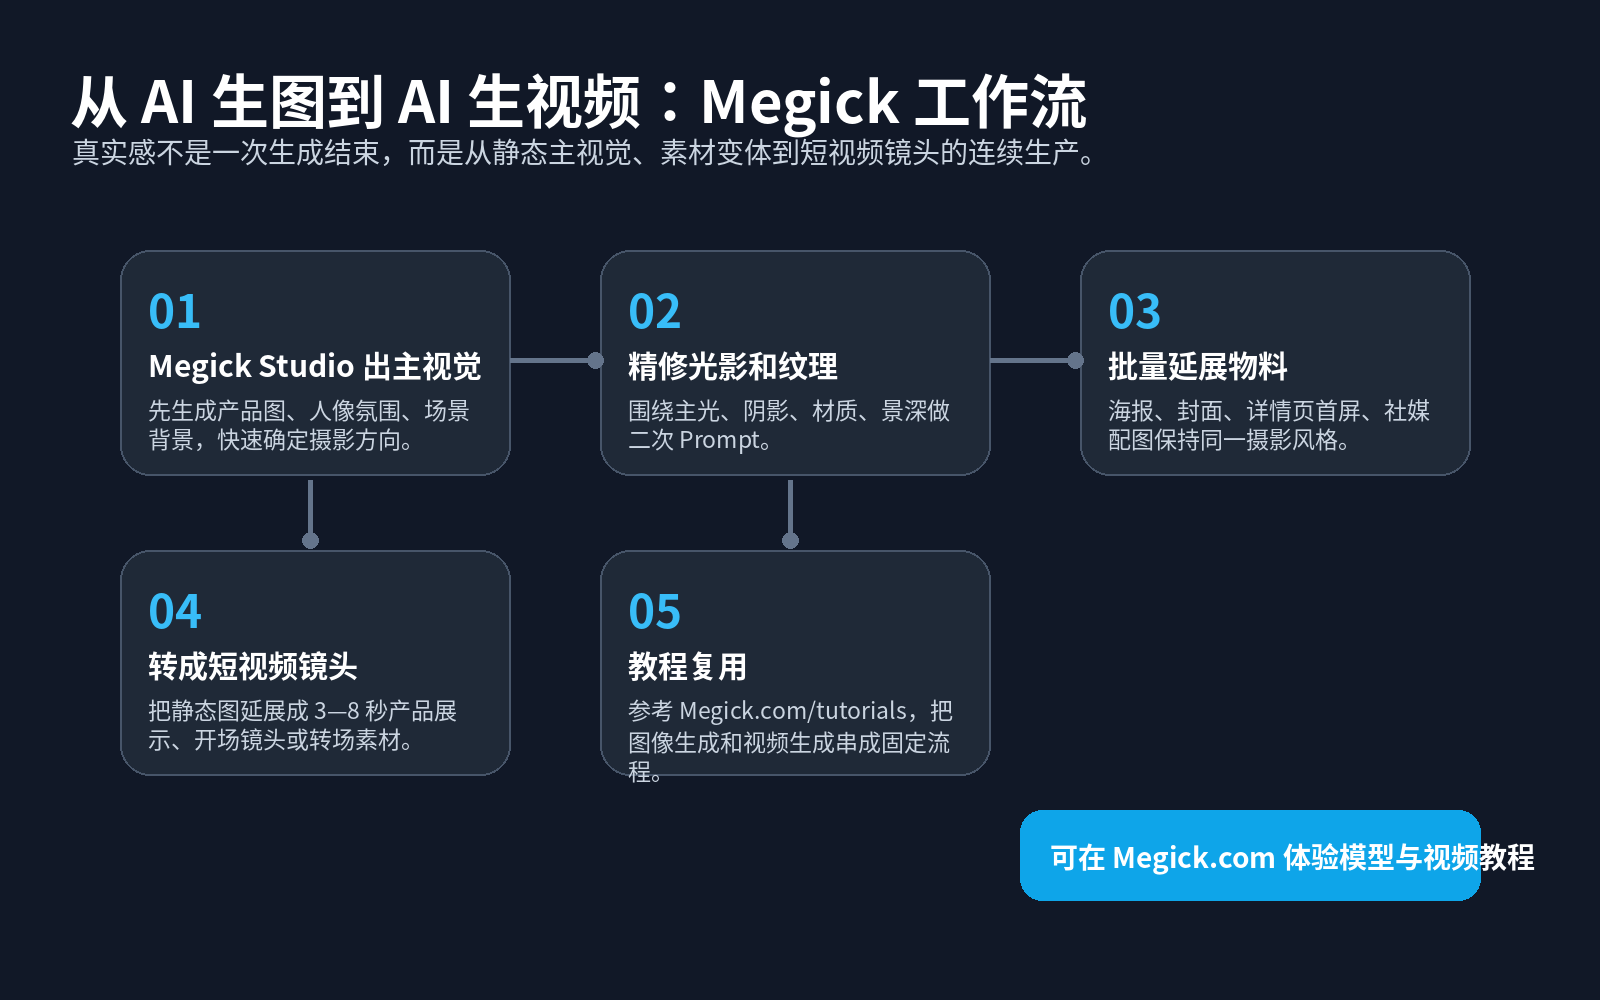
7. Megick Studio Workflow: From One Realistic Image to a Full Set of Campaign Assets
For occasional image generation, almost any model can be worth trying.
But if you are creating content for a social account, e-commerce store, brand campaign, or video advertising, what you actually need is a set of consistent visual assets that can continue to expand.
This is where Megick Studio can support a workflow closer to commercial production.
1. Establish the Key Visual Direction First
In Megick Studio, begin by generating six to ten key visuals with different photographic directions.
For example:
- Product images with natural window light;
- Restaurant atmosphere images with warm lighting;
- Studio product shots against a black background;
- Outdoor lifestyle scenes;
- Low-saturation street-style portraits;
- Premium home-interior visuals.
Confirm the overall visual direction first, then decide which route to refine. Do not spend all your time repeatedly adjusting one image at the start. First determine which visual language fits your brand best.
2. Refine Lighting and Materials
Once you choose a version that is close, do not immediately switch to a completely different style.
Refine it through questions such as:
- Where should the light come from?
- Should the shadows be soft or hard?
- Is the material matte, glossy, woven, glass, or metal?
- Should dust, fingerprints, wrinkles, and texture remain visible?
- Is the relationship between the product edges and the background believable?
- Is there enough negative space for copy and brand information?
3. Extend It into Different Platform Formats
The same key visual can then be adapted into:
- Xiaohongshu cover images;
- Douyin short-video opening frames;
- E-commerce product-detail hero sections;
- Website banners;
- Campaign-poster backgrounds;
- Feed-ad creatives;
- Email marketing headers.
This keeps your brand visuals unified instead of making every image look as though it came from a different design team.
4. Turn Static Images into AI Video
Photorealistic images are not the final destination.
Finalized images can also become AI video assets, such as:
- A three-second product rotation;
- Slow-motion coffee pouring into a cup;
- A portrait subject turning their head slightly and blinking naturally;
- Fabric moving gently;
- Steam rising from food while ambient lighting changes;
- Highlights slowly moving across a glass bottle.
Megick.com provides both AI image and AI video generation capabilities. Related video-generation tutorials can be found at:
https://megick.com/tutorials
For content teams, images establish the visual direction, while video improves retention and conversion. That is a more practical visual-production method for 2026.
8. A 12-Point Checklist for Realistic AI Images
Before publishing, check the following:
- Is the light-source direction clear?
- Are the shadows consistent with the light source?
- Is there a natural depth hierarchy between the subject and background?
- Is the skin over-smoothed?
- Does the product look like plastic?
- Are metal and glass reflections believable?
- Does food have realistic oil, moisture, and irregular edges?
- Do fabrics have visible weave and wrinkles?
- Are the colors overly saturated?
- Is the image excessively sharpened?
- Are there unnatural fingers, edges, or perspective errors?
- Does the image genuinely look like a photographer captured it in a specific real-world setting?
If three or more of these points clearly fail, the image usually cannot be considered truly photo-realistic yet.
9. Common Negative Prompts for Reducing the “AI Look”
When creating realistic AI images, negative constraints remain useful.
You can add the following depending on the scenario:
Avoid plastic texture, excessive skin smoothing, fake reflections, oversharpening, oversaturation, waxy skin, lighting with no visible source, overly clean backgrounds, commercial studio look, 3D-render appearance, unnatural perspective, incorrect fingers, and exaggerated filters.
For product images, you can add:
Avoid distorted product edges, garbled labels, inconsistent materials, floating shadows, and reflections that do not match the environment.
For portraits, you can add:
Avoid waxy skin, overly symmetrical facial features, fake smiles, excessive retouching, and hair blending into one flat mass.
For food imagery, you can add:
Avoid food that looks like plastic models, excessive oil sheen, floating plates, and ingredients that look unnaturally perfect.
However, do not turn negative prompts into the main body of the prompt.
First tell the model what image, light, lens, and materials you want. Negative constraints are there to refine the edges, not replace creative direction.
10. Conclusion: Photorealistic AI Images in 2026 Depend on Directing, Not Just Generating
AI image generation is becoming more powerful, but realistic photography effects do not appear automatically.
You need to think like a photographer when planning light, like an art director when controlling materials, and like a director when arranging scenes, camera choices, and the subject’s behavior.
Consistently convincing AI photography effects usually come from three things:
- Describing the shoot using photographic language;
- Describing real texture using material language;
- Using constraints to suppress plastic-looking and overly polished results.
If you only want to generate a beautiful image, writing “realistic,” “high resolution,” and “premium” may be enough.
But if you need commercial visuals that can be published, converted, and reused, it is worth saving the prompt formula and checklist from this article as a fixed workflow, then turning it into your own production process with Megick Studio.
From AI image generation to AI video generation, the creators with the strongest edge in 2026 will not simply be those who can generate one good image.
They will be the people who can continuously produce an entire set of realistic, polished, and campaign-ready visual assets.
Reference Materials
- OpenAI image-generation and prompting guidance: Recommendations for using photography language, lenses, lighting, composition, and texture descriptions.
- Google Gemini / Nano Banana image-generation materials: Guidance on conversational generation, editing, iteration, and image control.
- Adobe Firefly text-prompt guidance: Methods for describing subjects, backgrounds, colors, lighting, and style.
- Google DeepMind Imagen materials: Public information on photorealistic image generation and realistic-detail capabilities.